

Issuing Payments in ERPNext
Guide
Payment Entry Method 1: Individual Purchase Invoices
This approach works best when you are processing payments for individual SI or SA
Log into your ERPNext account
Click on Accounting
Click on Purchase Invoice
Search and open the Purchase Invoice you would like to make a payment entry against
5. In the Purchase Invoice form, click on Make then Payment
6. The Payment Entry form will be pre-filled with the details of the invoice you selected. You must now review the form and enter the correct information. Generally, you will want to review the Posting Date, Mode of Payment and Bank Account.
7. Enter the correct Paid Amount if it is not the same as the one pre-filled. If you change this value, you will note that the allocated amount that is applied against the invoice will also change
8. Go to Accounts. Enter the debit & credit accounts accordingly (e.g. Debit - Accounts Payable, Credit - Bank Account)

9. Enter the Reference No. and the Reference Date at the bottom of the form under Transaction ID
10. Click 'Save' or press CTRL+S to save the document. Note that this does not finalize the document yet. Instead, it saves the payment entry in draft status
11. Review the payment entry. If everything is in order, click 'Submit' or press CTRL+S to submit and finalize. You are done.
Payment Entry Method 2: multiple invoices
This approach works best when you are processing payments where the payment is matched against multiple Purchase Invoices, i.e. one check for multiple invoices
Log into your ERPNext account
Click on Accounting
3. Create a Payment Entry that will represent the amount of the payment. Under Billing, click on Payment Entry
4. Click on New
5. Under Payment Type, enter Pay
6. Enter Mode of Payment
7. Under Party Type, enter Supplier
8. Under Party, search and select the supplier you’re paying
9. Under Account Paid To and Account Paid From, select the account where the payment is being deposited & credited. Note that you can create accounts here as needed
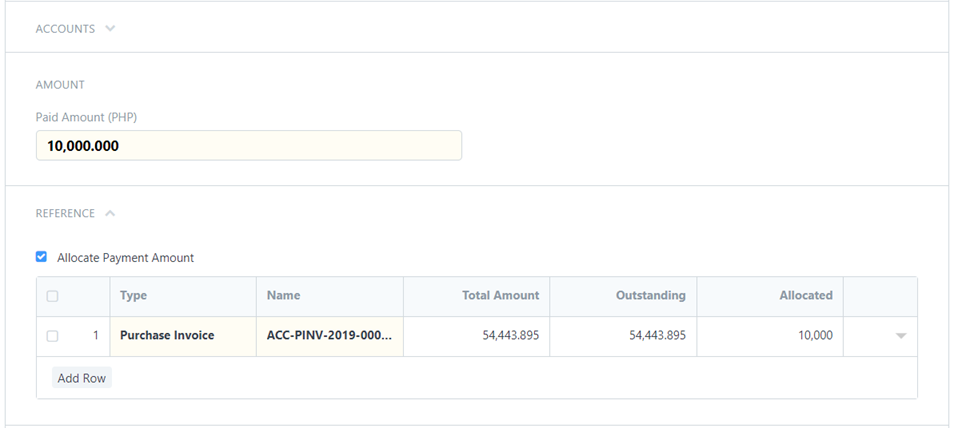
10. Under Paid Amount will be pre-filled by default the full amount outstanding with the customer. You can change this to reflect of the payment being made.
11. Two ways to allocate:
you can click on the 'Allocate Payment Amount' under Reference section to automatically allocate the payment amounts to the different invoices.
you can allocate by manually entering the amounts under the Allocated column. Important here is that the Difference Amount needs to be zero

12. Under Transaction ID, Enter the Reference No. and Reference Date
13. Click 'Save' or press CTRL+S to save the document. Note that this does not finalize the document yet. Instead, it saves the payment entry in draft status
14. Review the payment entry. If everything is in order, click on 'Submit' or press CTRL+S to submit and finalize. You are done.