

Creating a Work Order Plan
Guide
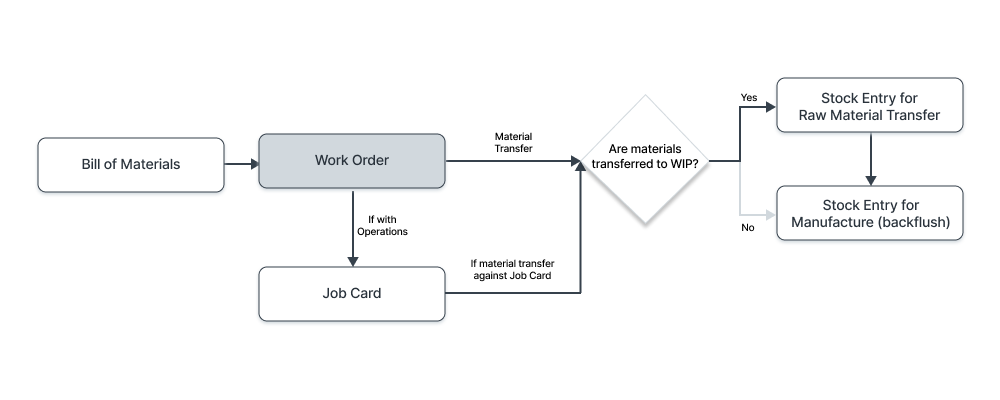
The manufacturing module revolves around the Work Order. The Work Order is the plan or document that is given to the manufacturing line or shop floor as the trigger to manufacture a certain quantity of an item. The following diagram illustrates how the Work Order is used to create Job Cards and Stock Transfer forms (which will be tackled in the next tutorial).
Before using the Work Order form, the following masters need to be set up:
Bill of Materials (BOM): the “recipe” of an item to be manufactured. This includes the raw material item codes and their quantities needed, as well as the operations used to transform a list of materials into another item code, typically a finished good.
Workstations: These are the production lines you use were you assign each production run, e.g. “plastic assembly station 1”. This is used to calculate the cost of manpower, electricity and other consumables during a manufacturing run depending on how long the work happens and how much quantity was outputted. Data regarding the operation cost, rent, electricity will be configured in the workstation.
Operations: These are the steps taken in the manufacturing process (for example: "Mixing", "Melting"). An Operation refers to any manufacturing operation performed on the raw materials to process it further in the manufacturing path. Operations need to be defined and included in the BOM in order to calculate the costs incurred at the workstation during manufacturing.
Setup the Workstations
Log into your ERPNext account
Click on Manufacturing
Under the Bill of Materials Heading, click on Workstation
To create a new Workstation, click on
Enter a name for the Workstation. Optionally, you can expand the Description section and provide a short description about the Workstation. This is useful if you have many Workstations to track.
Under Operating Costs, enter the following cost items as applicable:
Electricity Cost
Rent Cost
Consumable Cost
Wages
If everything is in order, click on or press CTRL+S to save.

Setup the Operations
Log into your ERPNext account
Click on Manufacturing
Under the Bill of Materials Heading, click on Operation.
Enter a name for the Operation (example: “melting”) under Operation Name.
Select the Default Workstation where the Operation will be performed. This Workstation will be fetched in new BOMs and Work Orders.
Add a Description to describe what the Operation involves. This is particularly helpful if you have a lot of operations to define.
If everything is in order, click on or press CTRL+S to save.

Keep in mind: The Operation master stores a single manufacturing operation, its description and the Default Workstation for the Operation
Setup the Bill of Materials
Log into your ERPNext account
Click on Manufacturing
Under the Bill of Materials Heading, click on Bill of Materials
Click on to create a new Bill of Material.
Find and select the item being manufactured under Item
Enter the quantity that will be outputted based on this BOM (default is 1) under Quantity
Tick the as we will need to include Operations applied to the item being manufactured in order to calculate the manufacturing cost
Under the Materials table, select the raw materials (Items) required to manufacture the Item. Then proceed to:

Select the quantity of Raw Material used in order to produce the Quantity of the output item defined earlier
Enter the valuation rate of the raw material being used
Set an Item Operation here to be fetched in Work Orders later.
Select the Source Warehouse where the item is typically issued from. Don’t worry, this can be changed later in case it will be coming from a different warehouse location.
9. Under the Operations table, select the operations used to manufacture this item
For each row, add the operations that need to be performed to manufacture this particular Item.
For each operation, you will be asked to enter a Workstation where the Operation will be performed. A default Workstation will be loaded if already defined
Enter the Operating Hourly Rate (defined in the default Workstation), Operation Time in minutes. The Operating Cost will be calculated based on these values
10. Under Transfer Material Against, choose either Work Order or Job Card
If you choose Work Order, you will be able to create an STE (Stock Transfer) from the Work Order immediately
If you choose Job Card, you will be able to create the STE from the Job Card
11. Click or press CTRL+S to save the document. Note that this does not finalize the document yet. Instead, it saves the BOM form in draft status
Creating the Work Order (Plan)
Log into your ERPNext account
Click on Manufacturing
Under the Bill of Materials Heading, click on Work Order
Click on to create a new Work Order
Under Item to Manufacture, select the Item to be manufactured.
The default BOM for that item will be loaded. You can also change the BOM
Under Qty to Manufacture, enter the quantity to manufacture and raw material items as defined in the selected BOM will be fetched. Operations defined in BOM will also be loaded into the Work Order
Set the Planned Start Date (an Estimated Date when you want the Production to begin).
Select Warehouses that will be used to source, hold and output to:
Source Warehouses: Select this Warehouse in the Item row (under the item table). This is the warehouse where you store your raw materials. Each required item can have separate source warehouse. On submission of Work Order, the raw materials will be reserved in these warehouses for production usage. If the item has a default warehouse defined in its Item Master, that warehouse will be loaded; you can still change this as needed
Work-in-Progress Warehouse: The warehouse where your Items will be transferred when you begin production. Group Warehouse can also be selected as a Work in Progress warehouse.
Target Warehouse: The warehouse where you store finished Items before they are shipped.
Scrap Warehouse: If the BOM results in Scrap material, the Scrap Warehouse needs to be selected. Otherwise, you can leave this blank
Click or press CTRL+S to save the document. Note that this does not finalize the document yet. Instead, it saves the Work Order in draft status
11. Review the Work Order. If everything is in order, click on or press CTRL+S to submit and finalize. You have now prepared your Work Order to produce a certain item. From here please proceed to how to Produce against the Work Order tutorial.
